hugo 使用 @
时隔四年,重新搭起个人博客。
网站从当初的 hexo 换为了 hugo 搭建,使用 hugo-coder 作为主题,进行了部分魔改。
hugo 安装 @
由于博主使用的 manjaro 系统作为日常开发、办公系统,可以使用 yay 直接进行安装
yay -S hugo
如果使用其他操作系统,可以参考 hugo 官方安装教程 进行安装
hugo 基础命令 @
首先学习下 hugo 的部分命令
hugo version         # 查看版本
hugo new site myblog # 创建目录结构
# 更改主题
cd myblog
git init
git submodule add https://github.com/luizdepra/hugo-coder.git themes/hugo-coder
echo "theme = 'hugo-coder'" >> hugo.toml
创建新文章
hugo new content content/posts/my-first-post.md
启动服务
# 启动服务
hugo serve --disableFastRender
可以通过 127.0.0.1:1313 端口访问本地博客,对于文档的更新,支持实时渲染
twikoo 评论系统 @
接下来介绍一下魔改部分, 首先 hugo-coder 自身没有支持 twikoo 评论系统,依照 twikoo 官方文档
首先需要搭建 twikoo 后端服务
- 搭建 mongodb 云数据库
- 搭建 twikoo 后端服务,并且连接云数据库
为此,我使用了官方文档推荐的 mongodb 云服务 和 netlify 来搭建
可以参考官方的 netlify 部署方式
搭建完成后,便可以在主题路径 themes/hugo-coder/layouts/partials/posts 下新建文件 twikoo.html,内容如下
<script src="https://cdn.jsdelivr.net/npm/twikoo@1.6.41/dist/twikoo.all.min.js"></script>
<div id="tcomment"></div>
<style>
    .twikoo {
        background-color: var(--card-background);
        border-radius: var(--card-border-radius);
        box-shadow: var(--shadow-l1);
        padding: var(--card-padding);
    }

    :root[data-scheme="dark"] {
        --twikoo-body-text-color-main: rgba(255, 255, 255, 0.9);
        --twikoo-body-text-color: rgba(255, 255, 255, 0.7);
    }

    .twikoo .el-input-group__prepend,
    .twikoo .tk-action-icon,
    .twikoo .tk-submit-action-icon,
    .twikoo .tk-time,
    .twikoo .tk-comments-no,
    .twikoo .tk-comments-count {
        color: var(--twikoo-body-text-color);
    }

    .twikoo .el-input__inner,
    .twikoo .el-textarea__inner,
    .twikoo .tk-preview-container,
    .twikoo .tk-content,
    .twikoo .tk-nick,
    .twikoo .tk-send {
        color: var(--twikoo-body-text-color-main);
    }

    .twikoo .el-button {
        color: var(--twikoo-body-text-color) !important;
    }

    .twikoo .el-input__count {
        color: var(--twikoo-body-text-color) !important;
    }

    .OwO .OwO-body {
        background-color: var(--body-background) !important;
        color: var(--body-text-color) !important;
    }
</style>

{{- with .Site.Params.twikoo -}}
<script>
    twikoo.init({
        envId: 'https://xxxxxx.app/.netlify/functions/twikoo',
        el: '#tcomment', // 容器元素
    })
</script>
{{- end -}}
修改 themes/hugo-coder/layouts/posts/single.html 文件, 在底部<footer>标签内,增加一行
<footer>
        {{ partial "posts/series.html" . }}
        {{ partial "posts/twikoo.html" . }}
        ....
      </footer>
到此,文章底部已经可以使用 twikoo 系统进行评论了
添加数学公式支持 @
由于我的一部分技术文章会写一些数学公式,准备使用 mathjax 支持对数学公式的渲染。
因此需要手动添加这部分功能
在路径 themes/hugo-coder/layouts/partials/head 下新建文件 mathjax.html, 内容如下
<script type="text/javascript"
        async
        src="https://cdn.bootcss.com/mathjax/2.7.3/MathJax.js?config=TeX-AMS-MML_HTMLorMML">
MathJax.Hub.Config({
  tex2jax: {
    inlineMath: [['$','$'], ['\\(','\\)']],
    displayMath: [['$$','$$'], ['\[\[','\]\]']],
    processEscapes: true,
    processEnvironments: true,
    skipTags: ['script', 'noscript', 'style', 'textarea', 'pre'],
    TeX: { equationNumbers: { autoNumber: "AMS" },
         extensions: ["AMSmath.js", "AMSsymbols.js"] }
  }
});

MathJax.Hub.Queue(function() {
    // Fix <code> tags after MathJax finishes running. This is a
    // hack to overcome a shortcoming of Markdown. Discussion at
    // https://github.com/mojombo/jekyll/issues/199
    var all = MathJax.Hub.getAllJax(), i;
    for(i = 0; i < all.length; i += 1) {
        all[i].SourceElement().parentNode.className += ' has-jax';
    }
});
</script>

<style>
code.has-jax {
    font: inherit;
    font-size: 100%;
    background: inherit;
    border: inherit;
    color: #515151;
}
</style>

<script src="//yihui.org/js/math-code.js" defer></script>
<script defer
  src="//mathjax.rstudio.com/latest/MathJax.js?config=TeX-MML-AM_CHTML">
</script>
在文件 themes/hugo-coder/layouts/partials/head.html 的底部添加
{{ partial "head/mathjax.html" . }}
自此,数学公式可以正确渲染,但这中间遇到了一个问题,如果公式包含三个以上大括号,会出现渲染问题。
经过互联网查询,参考了 这位大佬的 方案 , 添加了如下代码
<script src="//yihui.org/js/math-code.js" defer></script>
<script defer
  src="//mathjax.rstudio.com/latest/MathJax.js?config=TeX-MML-AM_CHTML">
</script>
但是依照他的方案,需要在公式前后用 `` 标注
在文章头部添加字数统计 @
hugo 框架提供了一些函数调用,使得可以轻松获取文章的统计字数。
在文件 themes/hugo-coder/layouts/posts/single.html 的标签<div class="post-meta">底部添加一个 span 来实现
<div class="post-meta">
  <div class="date">
    <span class="posted-on">
      <i class="fa-solid fa-calendar" aria-hidden="true"></i>
      <time datetime="{{ .Date.Format "2006-01-02T15:04:05Z07:00" }}">
        {{ .Date | time.Format (.Site.Params.dateFormat | default "January 2, 2006" ) }}
      </time>
    </span>
    <span class="reading-time">
      <i class="fa-solid fa-clock" aria-hidden="true"></i>
      {{ i18n "reading_time" .ReadingTime }}
    </span>
    <span class="post-word-count">
      <i class="fa fa-pie-chart" aria-hidden="true" style="margin-left: 10px;"></i>
      {{ .WordCount }} 字数
    </span>
</div>
添加目录侧边栏 @
由于 hugo 主题没有在文章内容页面增加目录侧边栏,我本身对前端技术不是特别懂,为了方便,因此利用 AI 给自己写了一个效果还不错的侧边栏,效果如下
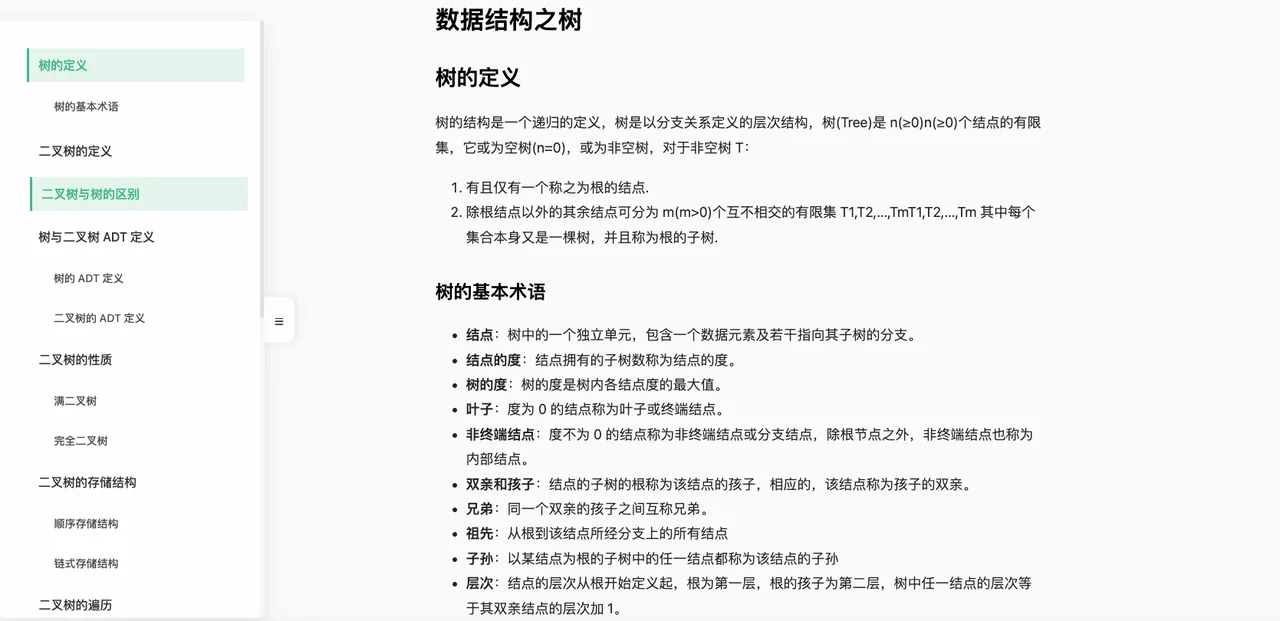
新建文件 themes/hugo-coder/layouts/partials/toc.html
<!-- 侧边栏目录 -->

  <aside class="table-of-contents">
    <div class="toc-container">
      {{ .TableOfContents }}
    </div>
  </aside>
新建文件 themes/hugo-coder/assets/css/top.css
/* CSS变量定义 */
:root {
    --bg-color: 255, 255, 255;
    --text-color: #333;
    --heading-color: #2c3e50;
    --border-color: 238, 238, 238;
    --accent-color: #42b983;
    --accent-rgb: 66, 185, 131;
    --scrollbar-color: 221, 221, 221;
    --scrollbar-track: 245, 245, 245;
}

/* 深色主题 */
@media (prefers-color-scheme: dark) {
    :root {
        --bg-color: 30, 30, 30;
        --text-color: #e0e0e0;
        --heading-color: #ffffff;
        --border-color: 60, 60, 60;
        --accent-color: #42d392;
        --accent-rgb: 66, 211, 146;
        --scrollbar-color: 80, 80, 80;
        --scrollbar-track: 50, 50, 50;
    }
}

/* 主容器样式 */
.table-of-contents {
    position: fixed;
    left: -380px;
    top: 30px;
    width: 400px;
    height: calc(100vh - 60px);
    background: rgba(var(--bg-color), 0.8);
    backdrop-filter: blur(10px);
    -webkit-backdrop-filter: blur(10px);
    box-shadow: 0 4px 20px rgba(0, 0, 0, 0.1);
    z-index: 1000;
    border-right: 1px solid rgba(var(--border-color), 0.3);
    color: var(--text-color);
    border-radius: 12px;
    transition: none;
}

/* 动画类 */
.table-of-contents.hidden {
    left: -380px;
    transition: all 0.8s cubic-bezier(0.68, -0.55, 0.265, 1.55);
}

.table-of-contents.visible {
    left: 0;
    transition: all 0.5s cubic-bezier(0.175, 0.885, 0.32, 1.275);
}

/* 触发区域样式 */
.table-of-contents::after {
    content: "☰";
    position: absolute;
    right: -40px;
    top: calc(50% - 30px);
    width: 40px;
    height: 60px;
    line-height: 60px;
    text-align: center;
    background: rgba(var(--bg-color), 0.8);
    backdrop-filter: blur(10px);
    -webkit-backdrop-filter: blur(10px);
    border-radius: 12px;
    box-shadow: 4px 0 15px rgba(0, 0, 0, 0.08);
    cursor: pointer;
    font-size: 1.8rem;
    color: var(--text-color);
    transition: color 0.3s ease;
    border: 1px solid rgba(var(--border-color), 0.3);
}

/* 内容容器样式 */
.toc-container {
    padding: 2rem;
    height: 100%;
    overflow-y: auto;
}

/* 标题样式 */
.toc-container h2 {
    font-size: 2.2rem;
    margin-bottom: 2.5rem;
    font-weight: 600;
    color: #2c3e50;
    border-bottom: 2px solid rgba(var(--border-color), 0.5);
    padding-bottom: 0.8rem;
}

/* 目录主体样式 */
#TableOfContents {
    font-size: 1.6rem;
}

#TableOfContents ul {
    list-style: none;
    padding-left: 2rem;
}

#TableOfContents ul li {
    margin: 1.2rem 0;
    line-height: 2;
}

/* 链接样式 */
#TableOfContents a {
    color: var(--text-color);
    text-decoration: none;
    padding: 0.6rem 1.2rem;
    border-left: 3px solid transparent;
    display: block;
    transition: all 0.2s ease;
}

#TableOfContents a:hover {
    color: var(--accent-color);
    background: rgba(var(--accent-rgb), 0.15);
    border-left-color: var(--accent-color);
    transform: translateX(4px);
}

#TableOfContents a.active {
    color: var(--accent-color);
    background: rgba(var(--accent-rgb), 0.15);
    border-left-color: var(--accent-color);
    font-weight: 500;
}

/* 多级目录样式 */
#TableOfContents ul ul {
    font-size: 1.4rem;
    opacity: 0.9;
}

/* 滚动条样式 */
.table-of-contents::-webkit-scrollbar,
.toc-container::-webkit-scrollbar {
    width: 5px;
}

.table-of-contents::-webkit-scrollbar-thumb,
.toc-container::-webkit-scrollbar-thumb {
    background: rgba(var(--scrollbar-color), 0.8);
    border-radius: 4px;
}

.table-of-contents::-webkit-scrollbar-track,
.toc-container::-webkit-scrollbar-track {
    background: rgba(var(--scrollbar-track), 0.5);
}

/* 响应式设计 */
@media (max-width: 1200px) {
    .table-of-contents {
        display: none;
    }

    .post-content {
        margin-left: 0;
    }
}
hugo.toml 配置注入 css,并更改标题显示配置
[params]
  ....
  customCSS = ["css/top.css"]


[markup]
[markup.highlight]
  noClasses = false
[markup.tableOfContents]
  startLevel = 1   # 从一级标题开始显示
  endLevel = 6     # 到六级标题结束
  ordered = false  # 使用无序列表
在 themes/hugo-coder/layouts/posts/single.html 下的<section class="container post">里注入 js 代码,实现侧边栏的动态隐藏滑动效果
<section class="container post">

  <script>
    document.addEventListener('DOMContentLoaded', function () {
      const toc = document.querySelector('.table-of-contents');
      if (!toc) return;

      // 初始状态设置为隐藏
      toc.classList.add('hidden');
      let timer;

      // 鼠标交互处理
      toc.addEventListener('mouseenter', () => {
        clearTimeout(timer);
        toc.classList.add('visible');
        toc.classList.remove('hidden');
      });

      toc.addEventListener('mouseleave', () => {
        timer = setTimeout(() => {
          toc.classList.remove('visible');
          toc.classList.add('hidden');
        }, 300);
      });

      // 滚动监听逻辑
      const headings = document.querySelectorAll('h1, h2, h3, h4, h5, h6');
      const tocLinks = document.querySelectorAll('#TableOfContents a');

      const observerOptions = {
        rootMargin: '-80px 0px -80px 0px',
        threshold: [0, 0.25, 0.5, 0.75, 1]
      };

      let currentActiveLink = null;
      let isScrolling = false;

      const observer = new IntersectionObserver(entries => {
        if (isScrolling) return;

        entries.forEach(entry => {
          const targetId = '#' + entry.target.id;
          const link = Array.from(tocLinks).find(link => link.getAttribute('href') === targetId);

          if (!link) return;

          if (entry.isIntersecting && entry.intersectionRatio >= 0.5) {
            if (currentActiveLink) {
              currentActiveLink.classList.remove('active');
            }
            link.classList.add('active');
            currentActiveLink = link;
          }
        });
      }, observerOptions);

      // 点击处理
      tocLinks.forEach(link => {
        link.addEventListener('click', (e) => {
          e.preventDefault();
          const targetId = link.getAttribute('href');
          const targetElement = document.querySelector(targetId);

          if (targetElement) {
            isScrolling = true;

            if (currentActiveLink) {
              currentActiveLink.classList.remove('active');
            }

            link.classList.add('active');
            currentActiveLink = link;

            window.scrollTo({
              top: targetElement.offsetTop - 80,
              behavior: 'smooth'
            });

            setTimeout(() => {
              isScrolling = false;
            }, 1000);
          }
        });
      });

      // 为每个标题添加观察
      headings.forEach(heading => {
        if (!heading.id) {
          heading.id = heading.textContent.trim().toLowerCase().replace(/\s+/g, '-');
        }
        observer.observe(heading);
      });
    });
  </script>
  .....
到此目录侧边栏就实现完成了
使用 github actions 部署个人网站 @
参考 hugo 官方提供的方法,使用 github action 进行部署,可以考虑买个域名,转发到 github 博客子域名上
https://gohugo.io/hosting-and-deployment/hosting-on-github/
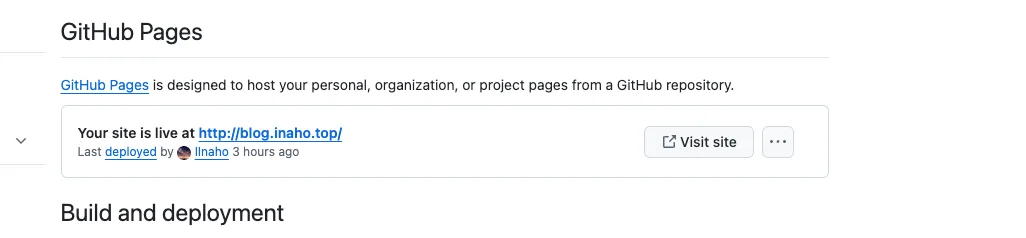
在 DNS 域名服务商,添加 CNAME 转发到自己的 github 子域名即可。